1.6. Organization of the Tutorial
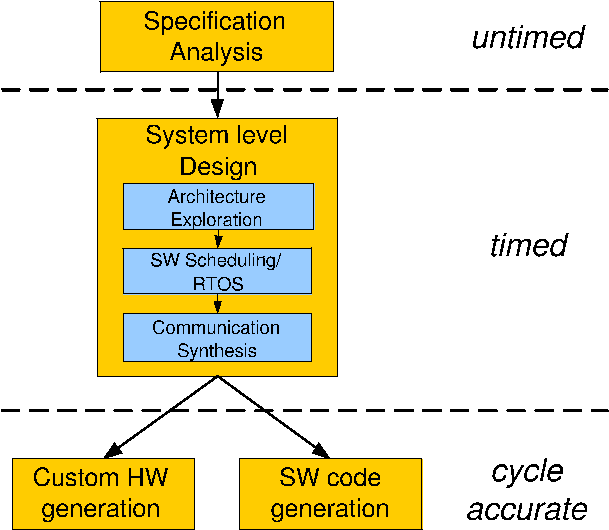
The tasks in system design with SCE are organized as shown in Figure 1-3. Each of the tasks is explained in a separate chapter in this tutorial. We will start with a specification model and show how to get started with SCE. At this level, we will be working with untimed functional models. Following that, we will look at system level exploration and refinements, where the involved models will have a quantitative notion of time. Once we get a system model with well defined HW and SW components and the interfaces between them, we will proceed to generate custom hardware and processor specific software. These final steps will produce cycle accurate models.
Each design task is composed of several steps like model analysis, browsing, generation of new models and simulation. Not all these steps are crucial for the demo to proceed smoothly. Some steps are marked as optional and may be avoided during the course of this tutorial. If the designer is sufficiently comfortable with the tool's result, he or she can avoid the typically optional steps of simulation and code viewing.
If the designer is booting from the CD-ROM, the setup is already prepared. Otherwise, the designer may follow the following steps to set up the demo. Start with a new shell of your choice. If you are working with a c-shell, run "source $SCE_INSTALLATION_PATH/bin/setup.csh". If you are working with bourne shell, run "$SCE_INSTALLATION_PATH/bin/setup.sh". Now run "setup_demo" to setup the demonstration in the current directory. This will add some new files to be used during the demo.
Acknowledgment:
The authors would like to thank Tsuneo Kinoshita of NASDA, Japan for his patience in going through the tutorial and helping us make it more understandable and comprehensive. We would also like to thank Yoshihisa Kojima of the University of Tokyo for his help in uncovering several mistakes in the tutorial's text.