4.2. Project Handling
Project handling deals with project issues. Project handling functionality is common and shared across all SCE tasks. It allows for tracking of design meta-data over the whole lifetime of a design. A project acts as a unified container that holds all information related to a certain design at various levels of abstraction, i.e. it contains all the information that describes the organization of design files that are part of the project. Furthermore, a project contains project-specific settings that can override or extend application-specific compiler settings (see Section 4.1). Specifically, a project contains the following information:
- Design models
A tree of design files and their relationship. If a design has been generated from another design through refinement, it is a child of the source design in the tree. For each model, the tree stores the design name, the location of the design's files on disk, the abstraction level, and the command used to generate the model.
- Imports
A list of imported design files. The list of imports contains the union of all designs/sub-designs imported by any of the models that are part of the project.
- Sources
A list of source files. The list of sources contains the union of all SpecC source files from which the models that are part of the project have been compiled. For each source file, the location (path) of the file on disk is stored in the project.
- Compiler settings
A set of project-specific options for preprocessing and parsing SpecC source files. Compiler settings contain include paths, import paths, compiler options, and macro defines and undefines. Project-specific compiler settings generally overwrite or extend the corresponding application-specific settings. In the case of paths, project paths are prepended to the standard paths defined in the application settings (i.e. they are prepended to the directory search list). In all other cases, options or macro defines/undefined are appended to the compiler command line after the standard options and macros defined in the application settings.
 | All paths in the project settings are defined to be relative to the location of the project file, i.e. relative paths in a project file are converted into absolute paths by appending the project file's directory during loading/opening of a project file. During saving/writing of project files, absolute paths are in turn converted back to relative paths if they point to a location below the target project file directory. |
Projects are stored as *.ser files on disk. The project file format is the same for all tools in the SCE environment, i.e. a project file can be read, modified and written by any SCE tool.
Projects can be read from and saved as project files at any time in the SCE application. At any time, however, at maximum only one project can be open and loaded. While a certain project is open and loaded, its settings apply to all actions performed during that time. In addition, certain actions will automatically update and add data in the currently opened and loaded project.
In order to deal with management of projects, SCE supports a set of project handling functions. Specifically, project handling consists of the following functions:
Project Creation to create a new projects (see Section 4.2.1).
Project Opening to open and load existing projects from project files on disk (see Section 4.2.2).
Project Saving to save the current project into a project file (see Section 4.2.3).
Project Settings to edit the settings of the opened project (see Section 4.2.4).
Design Adding to adds new design files into the opened project (see Section 4.2.5).
Design Opening to open a design model or import that is part of the project (see Section 4.2.6).
Design Deletion to delete a design model file from the project and optionally the disk (see Section 4.2.7).
Design Renaming to rename a design model and design file in the project and on disk (see Section 4.2.8).
Description Changing to change the description of a design model in the opened project (see Section 4.2.9).
Project Closing to close the current project (see Section 4.2.10).
4.2.1. Project Creation
Operation: Users can create a new project by selecting Main::Project->New.
Error/Information Messages: Assuming before project creation, users have opened another project in SCE, the currently opened project has been modified and the opened project is not saved yet. When users select Main::Project->New, an Information dialog will be popped up querying the user whether he wants to save the current project first before creating a new one. If the user accepts the recommendation, a Project Saving action (see Section 4.2.3) is performed first.
4.2.2. Project Opening
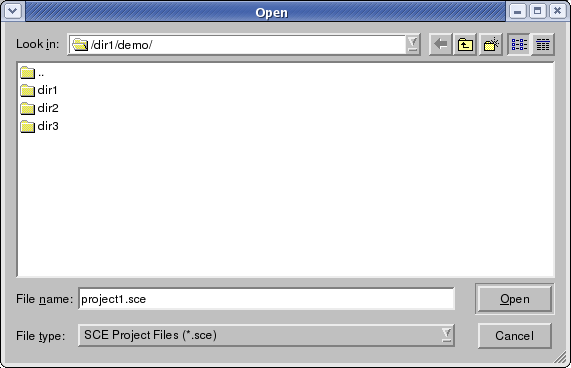
Operation: Users open an existing project by selecting Main::Project->Open.... The selection will pop-up the Project Open dialog in which the user can choose and select an existing project file on disk to open and load. The Project Open dialog is shown in Figure 4-5.
Users should first specify the project directory in Look-in box. The content of the directory will be automatically displayed in the display box in the center. The file type defaults to project files (*.ser). All the project files with the specified type will be displayed in the display box. Users further select the project file name in the File Name box. Finally, by clicking Open button, the project with the specified name will be opened. If users click the Cancel button, the action of project opening will be cancelled. Either clicking Open or Cancel button will close the Project Open dialog.
Error/Information Messages: If the specified project does not exist before clicking Open button, then clicking Open button has no effect.
In case of errors reading the project file from disk (file errors, wrong file format), an error dialog with a corresponding error message is popped up. Upon confirming the error, the Project Opening action is cancelled.
Assuming before project opening, users have opened another project in SCE, the opened project is modified and the opened project is not saved yet. When users open a different project, the Information dialog will be popped up to recommend users to save the previous project first and, if the recommendation is accepted, a Project Saving action will be performed. This is the same as the case in task Section 4.2.1.
4.2.3. Project Saving
Operation: Users can save the current project by one of the following two methods:
Selecting Main::Project->Save. The project will be saved using the current project name.
If the saved project is unnamed (a new project created by task Project Creating), then selecting Main::Project->Save will do the same action as selecting Main::Project->Save As (see below).
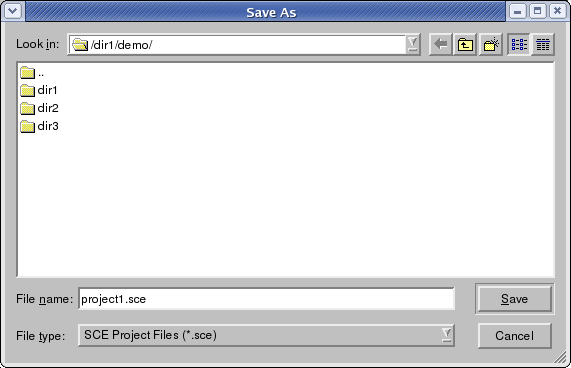
Users can save the current project under any (new) name by selecting Main::Project->Save As.... The selection will pop-up the Project Save dialog in which user can choose the directory and file name to save the project under. The Project Save dialog is displayed in Figure 4-6.
In the Project Save dialog, users should first specify the project directory in Look-in box. The content of the directory will be automatically displayed in the display box in the center. The file type defaults to project files (*.ser). All the project files with the specified type will be displayed in the display box. Users then select the project file name in File Name box. Finally, by clicking the Save button, the current project will be saved in a project file with the specified name. If users click Cancel button, then the action of project saving will be cancelled. Either clicking Save or Cancel button will close the Project Save dialog.
Error/Information Messages: When selecting Main::Project->Save As... and specifying the file name of an existing file on disk, an Information dialog will pop up asking the user whether he wants to overwrite the existing file. If the user declines this, the Project Saving action will be cancelled.
When selecting Main::Project->Save or Main::Project->Save As, errors may occur (file errors, e.g. if no space is available on the hard disk). In this case, an Error dialog as shown in Figure 3-9 will be popped up, corresponding error messages will be displayed, and the Project Saving action will be cancelled.
4.2.4. Project Settings Editing
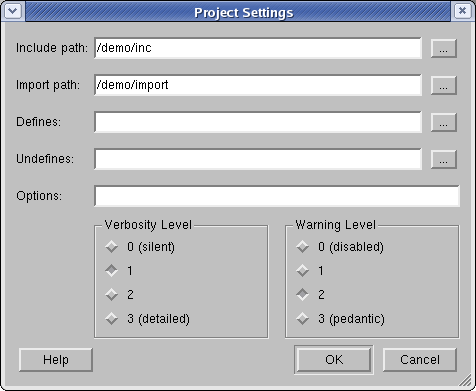
Operation: Project setting allows users to edit project settings. Unlike application preferences editing in Section 4.1, project setting apply only to the current project. Users start project settings editing by selecting Main::Project->Settings.... The selection will pop up the Project Settings dialog, which is displayed in Figure 4-7. In the Project Settings dialog, users can view and edit the compiler settings stored in the project. The dialog contains line edit boxes for all compiler settings. The text in the Include Path and Import Path lines defines the directory lists (separated by colons ":") for the project-specific include and import paths, respectively. The text in the Defines and Undefines lines define the list of macro defines and undefines (separated by semicolons ";"), respectively. The text in the Options line defines the project's compiler options/switches. Finally, Verbosity Level and Warning Level define verbosity level and warning level so that all tasks performed are logged and warning messages are enabled, respectively. See Section 4.1 for more details about compiler settings.
4.2.5. Design Adding
Operation: Users can add any currently opened design file to the project. In order to do that, users select Main::Project->Add Design. After clicking, the design corresponding to the currently active design window will be added to the project. The design will be added to the project as a new root in the forest of design model trees. In addition, any imported designs and source files of the new design will be merged into the list of imports and sources that are part of the project.
Error/Information Messages: If users try to add a file which is already in the current project, an error dialog with a corresponding error message will be popped up (as illustrated in Figure 3-9).
4.2.6. Design Opening
Operation: Double-clicking on a design model in the Project Window models or import tabs (Project::Models or Project::Imports), a file opening action on the given design file will be performed (see Section 4.3.1 for details, including error/information messages), i.e. a corresponding design window will be opened in the workspace. If the selected design is already opened in the workspace, its design window will be raised to the top and made active. The design opening action can also be triggered via corresponding context menu entries in the model and import tabs (selecting Project::Models->Open or Project::Imports->Open)
4.2.7. Design Deletion
Operation: Users can delete files from the current project and optionally from disk. Selecting the corresponding entry in the context menu of a design model in the Project Window models tab (Project::Models->Delete) will delete the selected design from the project and optionally from disk. In case of a model with children in the model tree, the user will also be given the option to recursively delete all the model's children.
Error/Information Messages: After selecting Project::Models->Delete, an Information dialog will be popped up to query to user whether he wants to also delete the corresponding model's files on disk. If the selected file has children, then another Information dialog querying the user whether he wants to also recursively delete all children and children's children of the selected model. If the selects recursive deletion, an Information dialog similar to the initial Information dialog to query about deletion of corresponding files on disk will pop up for each child model.
If file deletion on disk is selected, an error dialog may pop up in case of disk/file errors. Upon confirmation of the error, the Project Deletion action will be aborted.
4.2.8. Design Renaming
Operation: By selecting Project::Models->Rename or by clicking into the Design column of the Project Window models tab, users can rename the file name displayed in the Design column. Renaming is performed in place inside the column cell itself by opening a corresponding text edit box. Renaming can be aborted by pressing the Esc key. Pressing Enter accepts the newly entered name and renames the design both in the project and on disk. If the design is loaded and opened, the corresponding design window in the workspace will also be automatically renamed.
Error/Information Messages: If the new design name entered by the user is the name of a design already existing in the project, an Error dialog with a corresponding error message will pop up and, after confirmation, the design renaming action will be aborted.
If renaming the file on disk results in an error (file error), a corresponding Error dialog will be popped up and the design renaming will be aborted.
4.2.9. Description Changing
Operation: Users can change the file description displayed in the Description column of Project::Models tab by selecting the Project::Models->Change Description context menu entry or by clicking into the corresponding Description column in the row representing the selected file. After clicking, the corresponding cell in the Description column of Project::Models is editable in place. Editing can be aborted with Esc and is accepted by pressing Enter.
4.2.10. Project Closing
Operation: Users can close the current project by selecting Main::Project->Close.
Error/Information Messages: If the current project is modified and not yet saved, selecting Main::Project->Close will pop up an Information dialog which recommends to save the current project first. If the user accepts the recommendation, a project saving action (Section 4.2.3) is performed before closing the project.


